使用 XNA/3D 开发/3D 引擎创建游戏
3D 游戏引擎的示例,可以简化 3D 游戏的创建。 应该包含引擎的简短介绍、功能、支持,以及使用它的示例项目。 3D 引擎的示例可以在这里找到:http://forums.create.msdn.com/forums/t/12882.aspx

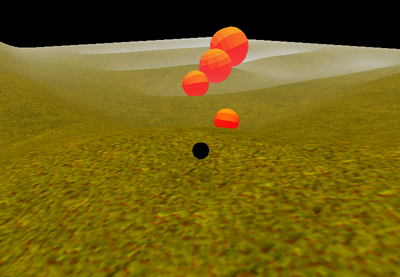
快速入门引擎是一个面向 XNA 的 3D 游戏引擎,它允许开发者尽快开始 3D 游戏编程。[1]
当前版本为 0.262。 它仍然处于测试阶段。 引擎在 Ms-PL 下发布,这意味着它是免费使用的。
包括物理引擎、游戏内 GUI 框架、阴影贴图、法线贴图、用于地形的多纹理混合等等。
- Visual Studio 2010
- XNA 游戏工作室 4.0

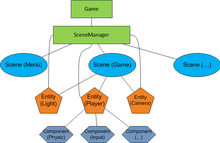
快速入门引擎的概念很容易理解。
一个游戏是由场景组成的。 这些场景存储在场景管理器中,它是游戏类 "QSGame" 的一部分。 场景管理器负责加载和保存当前场景。
一个场景是由实体组成的。 场景中的每个对象都是一个实体! 它可以是相机、地形、灯光、玩家以及其他任何东西。
一个实体只包含基本信息,例如位置和旋转。 要赋予它模型或相机等功能,您必须添加组件。
组件绑定到实体,负责诸如保存模型、处理输入或发出灯光等操作。
另一个重要的事实是,每个实体都必须手动添加到游戏场景管理器中!
引擎还具有一个消息系统,它允许游戏的每个部分发送和接收请求。 这些请求可以包括更改当前相机、输入或移动等操作。
如何在您的项目中实现引擎
- 访问 http://quickstartengine.codeplex.com/ 并下载最新版本(本教程基于 V0.26)。
- 由于您可能希望对引擎进行更改(请注意许可证!),因此您应该将文件夹 "QuickStart Engine v0.26\framework\code" 复制到您的项目文件夹中。
- 为了更好地理解,将 "code" 重命名为 "QS" 或 "QuickStart" 等名称。
- 现在使用 VS2010 打开您的项目解决方案文件。
- 打开解决方案资源管理器,右键单击您的解决方案,然后单击 "添加现有项目"。
- 根据您计划编程的平台,从 "QS" 中的每个文件夹中选择 csproj/vsproj 文件(如果没有特定的 Windows/XBox 项目文件,则选择通用文件)。
- 现在在您的 XNA 项目中执行以下操作
- 转到 '<您的 XnaGame> -> 引用' 并添加对解决方案中所有项目的引用。
- 在 "内容" 中的引用中添加 "QuickStart_>Windows/XBox>" 和 "QuickStart.ContentPipeline"
- 在您的 Game.cs 中...
- 添加 "using QuickStart;"
- 将您的游戏设置为 QSGame 的子类。
就是这样! 您的游戏现在基于快速入门引擎!
如何创建一个场景
在游戏初始化期间,所有场景都必须创建并添加到场景管理器中。 您必须在游戏的 LoadContent 方法中执行此操作。
protected override void LoadContent()
{
    base.LoadContent();
    //create and load all scenes here
    Scene newScene = new PlayScene(this);
    Scene anotherScene = new AnotherScene(this);

    this.SceneManager.LoadScene(newScene, true);
    this.SceneManager.LoadScene(anotherScene, true);
    //choose the currently active Scene
    this.SceneManager.ActiveScene = newScene;
}
当场景初始化时,它可以加载以后可能需要的任何东西,包括模型、纹理、图像等等。 尽管如此,资产可以在您需要时随时加载。
更新: 应该注意的是,自该评论最初发布以来,将实体加载到您的场景中已变得非常简单。 以下是有关如何加载实体和组件而无需使用任何 C# 代码的文档,您现在可以完全使用 XML 定义您的实体。http://quickstartengine.codeplex.com/wikipage?title=Creating%20Entities%20and%20Components%20with%20XML
如何创建一个地形
这个有点棘手。
确保您的 Content 文件夹中包含 "Material\Terrain.qsm"。 最好是从引擎附带的测试项目中获取该文件。 您可以在以下路径中找到它:"QuickStart Engine v0.22\framework\test\QuickStartSampleGame\Content\Material"。
将文件添加到项目后,您可能需要在属性中将导入器和处理器更改为 "QuickStart 材料导入器/处理器"。
我们稍后会再次查看此文件。
要创建一个地形,您需要一个灰度 高度图。 它必须是正方形的,并且一侧的长度必须是 2 的幂(2、4、8、16、32、64、...)。
现在在场景中创建地形非常容易
//create Terrain
Terrain terrain = new Terrain(game, QuickStart.Graphics.LOD.High);
terrain.Name = "MyTerrain";

//set the elevation strength and load the heigtmap
terrain.ElevationStrength = 75;
terrain.Initialize("./Images/heightmap", 1, 4);

//add physic to terrain
PhysicsComponent tf = new PhysicsComponent(terrain, terrain.heightData, terrain.ScaleFactor);
//add the terrain (which is derived from BaseEntity) to the SceneManager of your game
game.SceneManager.AddEntity(terrain);
}
现在只剩下一个东西了! 您必须为您的地形添加纹理贴图。 此贴图必须与高度图大小相同,并使用三种颜色来定义地面的纹理。
red   (255,0,0) = rocks
green (0,255,0) = grass
blue  (0,0,255) = water
仔细查看 "Terrain.qsm"。 您会找到 "TEXTURE_MAP" 的路径。 将其更改为您放置图像的位置。 要创建贴图,您可以使用任何 图像处理 软件。 以无损格式(例如 "png")保存它。
如何创建一个实体
场景中的所有内容都源自 BaseEntity。 每当您要创建一个对象时,您都必须从创建一个 BaseEntity 对象开始。
实体本身是不可见的。 您必须添加 RenderComponent,在其中设置模型和材质。 如果您希望为您的实体进行碰撞检测和/或物理运算,您可以添加 PhysicsComponent。 这是一个简单的球体示例。
//BaseEntity(your game,position, rotation, scale)
BaseEntity sphere = new BaseEntity(this.game, new Vector3(500, 100, 510), Matrix.Identity, 5f);
sphere.Name = "sphere";
//RenderComponent(parent object, path to model, path to material)
RenderComponent r = new RenderComponent(sphere, "Models/unit_sphere", "Material/SimpleColored");
r.modelColor = Color.Orange;
(((Physicscomponent(parent object, type of collider, density, reacts to forces)
PhysicsComponent p = new PhysicsComponent(sphere, ShapeType.Sphere, 5,true);
//add the entity to your games SceneManager
game.SceneManager.AddEntity(sphere);
如何添加一个第三人称相机
每个对象都可以用作相机,这对于第一人称视角或监控摄像头等情况很有用。
对于第三人称视角,我们需要一个新的 BaseEntity,并将 CameraComponent 添加到其中。 我们还向其添加了 ArcBallCameraInputComponent,这使我们以后可以旋转相机。 完成此操作后,您必须将相机添加到场景管理器中,因为我们必须发送一些消息,这些消息只有在相机已为游戏所知的情况下才会起作用。
BaseEntity cam = new BaseEntity(game,new Vector3(20,0,20),Matrix.Identity,1);
//CameraComponent(object, Field of View,screen width, screen height, near plane, far plane)
CameraComponent camComp = new CameraComponent(cam, 60f, game.Settings.Resolution.X, game.Settings.Resolution.Y, 0.5f, 1000);
//add the input component
ArcBallCameraInputComponent thirdPersonCam = new ArcBallCameraInputComponent(cam);

game.SceneManager.AddEntity(cam);
- 第一条消息是,可以说从现在开始这是主相机
MsgSetRenderEntity RndMsg = ObjectPool.Aquire<MsgSetRenderEntity>();
RndMsg.Entity = cam;
this.game.SendInterfaceMessage(RndMsg, InterfaceType.Camera);
- 第二条消息将玩家对象设置为父对象
MsgSetParent msg = ObjectPool.Aquire<MsgSetParent>();
msg.ParentEntity = playerEntity;
msg.UniqueTarget = cam.UniqueID;
game.SendMessage(msg);
- 第三条消息是,可以说玩家与相机一起旋转
MsgLockCharacterRotationToCamera msg = ObjectPool.Aquire<MsgLockCharacterRotationToCamera>();
msg.UniqueTarget = player.UniqueID;
msg.LockRotation = true;
game.SendMessage(msg);
最后,您的相机始终处于玩家身后的第三人称视角!
如何创建一个角色对象
在没有玩家的情况下,第三人称相机毫无用处。 您将从之前的示例中识别出大部分脚本。
BaseEntity player = new BaseEntity(this.game, new Vector3(500, 100, 500), Matrix.Identity, 1);
player.Name = "player";

RenderComponent comp = new RenderComponent(player, "Models/unit_sphere", "Material/SimpleColored");
//you can set whether an object receives and creates shadows
comp.SetShadowingProperties(true, true);
comp.modelColor = Color.Blue;

//The engine already has special physics and an input component for a player
CharacterPhysicsComponent newPhysComponent = new CharacterPhysicsComponent(player, ShapeType.Sphere, 5.0f);
CharacterInputComponent input = new CharacterInputComponent(player);

game.SceneManager.AddEntity(player);

//Tell the game, that this is the controlled object
MsgSetControlledEntity msgSetControlled = ObjectPool.Aquire<MsgSetControlledEntity>();
msgSetControlled.ControlledEntityID = player.UniqueID;
this.game.SendInterfaceMessage(msgSetControlled, InterfaceType.SceneManager);
如何创建一个灯光
我们基本场景的最后一步是添加灯光。 每个实体都可以发出灯光。 因此,您只需创建灯光设置、LightEmitterComponent,并在将其添加到场景管理器后初始化它。 这可能看起来像这样
BaseEntity light = new BaseEntity(game, new Vector3(0, 500, 0), Matrix.CreateRotationX((float)Math.PI/2f), 1);
light.Name = "light";

LightSettings s =  new QuickStart.EnvironmentalSettings.LightSettings();
s.LightDirection = Vector3.Down;
s.AmbientColor = new Vector4(1f, 0f, 0f, 0f);
s.DiffuseColor = new Vector4(0f, 1f, 0f, 0f);
s.SpecularColor = Vector4.Zero;
s.MinimumAmbient = 50f;
s.SpecularPower = 10f;

LightEmitterComponent lc = new LightEmitterComponent(light, s);
game.SceneManager.AddEntity(light);

lc.InitializeLightDirection();
快速入门引擎很有潜力,但需要一些时间才能理解其运作方式。 在某些方面,它有点过于静态,需要改进。
引擎已更新以支持 XNA 4.0,并且实体和组件的加载现在也简单得多,可以使用 XML 完全完成。 自该评论发布以来,还添加了其他功能,例如模型的纹理贴图和游戏内 GUI。
juliusse
