使用 C 和 C++/泛型容器的编程语言概念
在本章中,我们将研究泛型容器的实现,即向量。我们的模块将使客户能够创建和操作包含不同数据类型的项目的向量。通过这样做,我们将模拟 C++ 风格的容器,这些容器包含特定类型的对象。[1] 也就是说,特定的容器要么是 int 的集合,要么是 double 的集合,但不会是两者的混合。这与 1.5 之前的 Java 风格容器形成对比,后者容器是 Object 的集合,因此可以包含属于不兼容类的项目。
我们将在这份讲义中讨论的另一个 C 编程方面是使用可变参数函数来弥补重载的缺失。可变参数函数使程序员能够在命名参数之上拥有不定数量的未命名形式参数,可以用来为重载提供一种简陋的替代方案。我们所要做的就是让调用者提供一个额外的参数来区分重载函数候选者。
示例:不写
void f(int); void f(int, int); void f(double);
f(3); f(3, 3); f(3.0);
我们现在写
void f(int func_type, ...);
f(ONE_INT, 3); f(TWO_INTS, 3, 3); f(ONE_DOUBLE, 3.0)
我们的介绍将以关于静态目标模块库的一些内容结束。
#ifndef GENERAL_H

#define GENERAL_H

...
...
以下宏定义代表了在实现抽象数据类型过程中应考虑的构造函数类型。
#define COPY 0
#define DEFAULT 1

...
从已存在的 Vector 对象创建副本涉及复制其组件。稍加思考,我们就会发现没有通用的函数可以满足此目的。事实上,相同的数据类型可能在不同的上下文中需要不同的此类函数。相同的论据适用于销毁 Vector 对象的情况。
那么,我们(程序员)是否应该提供每一个可能的复制和销毁函数?这违背了提供泛型容器的目的。我们必须让用户与我们合作。实现这一点的方法是通过以下指向函数类型的定义。
typedef Object (*COPY_FUNC)(Object);
typedef void (*DESTRUCTION_FUNC)(Object);

#endif
#ifndef VECTOR_H
#define VECTOR_H

#include "General.h"

struct _VECTOR;
typedef struct _VECTOR* Vector;
我们想要实现一个泛型向量。也就是说,一个可以将任何东西作为其组件的向量:int 的向量、字符串的向量、学生记录的向量等等。鉴于此要求以及组件结构只能由用户(而不是实现者)知晓,我们需要让用户提供一些关于复制和销毁向量组件的帮助。基本上,用户必须实现这两个函数,并以某种方式将其传递给实现者。换句话说,用户和实现者必须合作;用户必须填写实现者提供的框架中的缺失部分。维护学生记录向量的用户必须提供学生记录类型的复制和销毁函数;处理员工记录的用户必须为员工记录类型提供相同的函数;...
这种编程风格与传统技术不同,在传统技术中,库的用户开发调用库函数的算法,但每个新应用程序的应用程序的总体结构和控制流都不同。虽然几乎所有 C 程序都使用 I/O 库,但特定程序的总体结构独立于其他程序;I/O 库中提供的例程只是所有程序共有的“低级”操作,不需要针对特定应用程序的需求进行定制。这是在 Pascal 和 C 等过程式编程语言中使用的技术。[2]
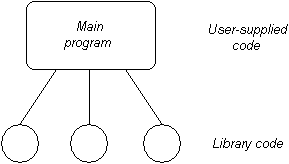
然而,在软件框架的使用中,是总体结构,算法的高级视图保持不变,并在应用程序之间重复使用。程序员(框架的用户)专门化框架,但大多数代码在所有应用程序中都保持相同。由于库代码和用户提供的代码之间的关系发生了这种逆转,软件框架有时被称为“颠倒”的库。

最著名的软件框架是与图形用户界面相关的那些。执行图形程序的主要任务 - 等待用户移动或点击鼠标,等待击键,移动或调整窗口等等 - 在一个应用程序到另一个应用程序之间变化不大。因此,这些操作可以有效地组合在一个框架中,不仅可以节省开发新应用程序的编程工作量,还可以确保应用程序之间的一致性。区分一个程序与另一个程序的是诸如窗口内容以及响应鼠标点击或击键而执行的操作等功能。这些操作必须在框架的每个特定应用程序中重新编程。
这是面向对象编程语言中选择的风格。要创建一个新应用程序,只需要从原始类中进行子类化(使用继承),然后实现与这些延迟函数相关的行为即可。所有其他功能,包括应用程序的总体结构,都是通过使用继承“免费获得”的。流行的例子是基于 C++ 的 MFC(Microsoft Foundation Classes)和基于 Java 的 JFC(Java Foundation Classes)。
如果实现者可以“回调”到某些用户代码,这种编程风格(软件框架)将是可能的。在面向对象编程语言中,这可以通过实现框架中定义的接口或对抽象类进行子类化并在该类中实现抽象函数(例如鼠标点击、击键等)来完成。在 C 中,我们可以通过使用函数指针来做到这一点。我们所要做的就是定义函数签名(我们现在正在做),并将这些定义用作某些函数中参数的类型。回调是在实现者通过传递给函数的函数指针调用用户代码时发生的。
typedef struct _Object_funcs {
  COPY_FUNC copy_component;
  DESTRUCTION_FUNC destroy_component;
} Vector_Component_Funcs;

#define NON_EXISTING_VECTOR -1

#define INIT_CAP 2
#define BOTH 3
以下函数签名是 C 中声明可变参数函数的一个示例。在规范中使用的省略号表示在命名参数之后将出现未知数量的参数。[3] 传递给可变参数函数的参数数量是从一个或多个命名参数的内容中推断出来的。以 printf 函数为例,其原型如下所示。
int printf(const char *format_string, ...);
占位符,以“%”开头的某些字符序列,有助于确定参数的数量和类型。
extern Vector Vector_Create(int constructor_type, ...);
extern int Vector_Destroy(Vector* this);
extern void Vector_Assign(Vector* lhs, const Vector rhs);
extern Object Vector_ElementAt(const Vector this, unsigned int pos);
extern Object Vector_InsertAt(const Vector this, Object item, unsigned int pos);
extern Object Vector_RemoveAt(const Vector this, unsigned int pos);
extern Object Vector_UpdateAt(const Vector this, Object new_item, unsigned int pos);
extern unsigned int Vector_Size(const Vector this);

#endif
#include <stdarg.h>
#include <stddef.h>
#include <stdio.h>
#include <stdlib.h>
#include <string.h>

#include "General.h"
#include "utility/Vector.h"
为了控制在不同句柄(实际上是我们的指针)之间共享的特定对象的生存期,我们使用一个额外的字段来保存提供对相同底层对象的访问的句柄数量。这样的字段被称为引用计数。
结构定义的最后一个字段可以看作 Object container[];,为了教学目的。也就是说,一个 Vector 基本上是一个 Object 的数组。使用 * 而不是 [] 使我们能够动态地更改 Vector 的大小。如果我们使用 [],我们必须在编译时指定大小,这对于我们的目的来说太严格了。
struct _VECTOR {
  COPY_FUNC copy_component;
  DESTRUCTION_FUNC destroy_component;
  unsigned int ref_count;
  unsigned int cap;
  unsigned int cap_inc;
  unsigned int cur_size;
  Object *container;
};

static BOOL adjust_capacity(const Vector);
static void shift_down(const Vector, unsigned int);
static void shift_up(const Vector, unsigned int);

Vector Vector_Create(int type, ...) {
  int i;
以下行声明了一个变量,该变量将在遍历未命名参数列表时使用。
  va_list ap;
  Vector existing_vec;
  Vector_Component_Funcs comp_funcs;

  Vector ret_vec = (Vector) malloc(sizeof(struct _VECTOR));
  if (!ret_vec) {
    fprintf(stderr, "Out of memory...\n");
    return NULL;
  } /* end of (!ret_vec) */

  ret_vec->cur_size = 0;
  ret_vec->ref_count = 1;
  ret_vec->container = NULL;
以下宏用于初始化未命名参数列表,以便 ap 中的内部指针指向最后一个命名参数之后的位置。

  va_start(ap, type);
  switch (type) {
    case COPY:
下一行返回一个类型为 Vector 的参数,并使内部指针前进,使其指向该 Vector 参数之后的 location。执行此语句后的运行时堆栈如下所示:[4]

existing_vec = va_arg(ap, Vector);
在这里,我们检索用户传递的函数指针。每次我们需要复制或销毁组件时,我们将回调到在给定地址找到的函数。
      ret_vec->copy_component = existing_vec->copy_component;
      ret_vec->destroy_component = existing_vec->destroy_component;
      ret_vec->cap = ret_vec->cur_size = existing_vec->cur_size;
      ret_vec->cap_inc = existing_vec->cap_inc;
除了 malloc,我们也可以使用 calloc 从堆中分配一块内存区域。该函数分配足够大的内存来容纳 n(作为第一个参数传递)个元素,每个元素的大小为 m(作为第二个元素传递);它返回指向数组第一个元素的指针。这当然可以通过 malloc 来完成。作为额外功能,返回的区域将进行位清零操作,而 malloc 不会进行此操作。
使用 calloc 分配的内存可以使用 free 或 cfree 返回。但请记住,尽管 cfree 非常普遍,但它并不是标准的 C 函数。
| 问题 | ||
|---|---|---|
我们可以使用 calloc 分配内存来存储一个初始值为 0 的 int 吗?对于初始值为 0.0 的 float 呢?你能保证答案总是相同吗?
| ||
|
      ret_vec->container = calloc(existing_vec->cur_size, sizeof(Object));
      for(i = 0; i < existing_vec->cur_size; i++)
        ret_vec->container[i] = existing_vec->copy_component(existing_vec->container[i]);
      break;
    case DEFAULT:
      comp_funcs = va_arg(ap, Vector_Component_Funcs);
      ret_vec->copy_component = comp_funcs.copy_component;
      ret_vec->destroy_component = comp_funcs.destroy_component;
      ret_vec->cap = ret_vec->cap_inc = 0;
      break;
    case INIT_CAP:
      comp_funcs = va_arg(ap, Vector_Component_Funcs);
      ret_vec->copy_component = comp_funcs.copy_component;
      ret_vec->destroy_component = comp_funcs.destroy_component;
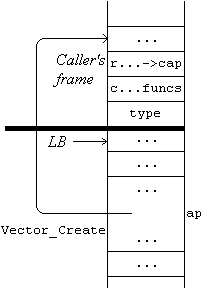
      ret_vec->cap = va_arg(ap, unsigned int);
      ret_vec->cap_inc = 0;
      if (ret_vec->cap <= 0) break;
      ret_vec->container = calloc(ret_vec->cap, sizeof(Object));
      break;
    case BOTH:
      comp_funcs = va_arg(ap, Vector_Component_Funcs);
      ret_vec->copy_component = comp_funcs.copy_component;
      ret_vec->destroy_component = comp_funcs.destroy_component;
      ret_vec->cap = va_arg(ap, unsigned int);
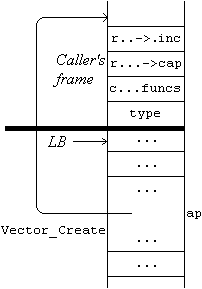
      ret_vec->cap_inc = va_arg(ap, unsigned int);
      if (ret_vec->cap <= 0) break;
      ret_vec->container = calloc(ret_vec->cap, sizeof(Object));
      break;
  } /* end of switch(type) */
va_end 对 ap 执行必要的清理操作。换句话说,它充当析构函数的作用。在使用 va_arg 读取所有参数后,程序员应该调用它。
  va_end(ap);

  return(ret_vec);
| 问题 | ||
|---|---|---|
| 以下哪种内存布局更适合实现可变参数函数? | ||
|
| 问题 | ||
|---|---|---|
| 在 C 中,您认为谁负责从运行时堆栈中移除参数,是调用方还是被调用方? | ||
|
} /* end of Vector Vector_Create(Constructor_type, struct basic_funcs, ...) */
下面给出了 Vector 对象的结构。
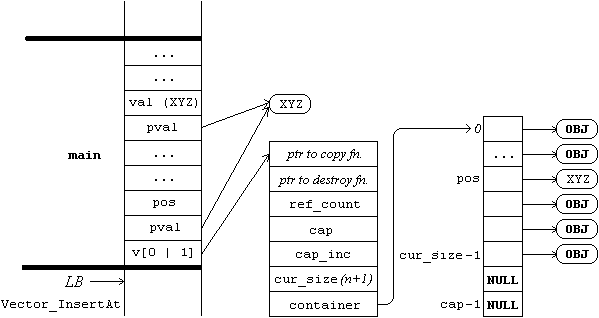
用户通过句柄(图中的这个变量)访问 Vector 对象。表示是隐藏的,它只能通过 Vector 公共接口中的函数来修改。
请注意,句柄是指向 Vector 的属性,而不是指向其组件。这是实现集合类型时采用的典型方法。您拥有某些元数据的句柄,这些元数据(除了定义集合的属性外)还拥有用于保存组件的容器的句柄。
int Vector_Destroy(Vector* this) {
  int i;
  Vector this_copy = *this;

  if (this_copy == NULL) return(NON_EXISTING_VECTOR);
调用 Vector_Destroy 函数并不意味着底层对象将被销毁。在多个句柄共享某个对象的情况下,引用计数将递减,而底层对象保持不变。如果引用计数为 1,我们将切断对象与其最后一个句柄之间的联系。在这种情况下,我们还必须销毁底层对象!
  if(this_copy->ref_count > 1) {
    *this = NULL;
    return(--this_copy->ref_count);
  } /* end of if(this_copy->ref_count > 1) */
请注意,destroy_component 是指向函数的指针。也就是说,函数是通过指针调用的;我们可以通过分配不同的指针值来更改被调用的函数。这实际上赋予了我们处理不同数据类型的能力。[8]
  for (i = this_copy->cur_size - 1; i >= 0; i--)
    this_copy->destroy_component(this_copy->container[i]));

  free(this_copy->container); free(this_copy);
  *this = NULL;

  return 0;
} /* end of int Vector_Destroy(Vector*) */

Object Vector_ElementAt(const Vector this, unsigned int pos) {
  Object ret_object;

  if (pos >= this->cur_size) return NULL;
请注意,我们返回了所需组件的副本,而不是指向它的指针。这样做的理由是避免对底层数据结构进行任何访问。
  ret_object = this->copy_component(this->container[pos]);

  return(ret_object);
} /* end of Object Vector_ElementAt(const Vector, unsigned int) */
下一个函数将一个 Vector 对象分配给另一个对象。由于 C 中没有运算符重载,我们必须想出一个函数名称,并使用这个名称来执行赋值。当然,我们仍然可以使用 '=' 来做到这一点。但是,这样做会导致不一致的状态,即引用计数和共享底层对象的句柄数量不一致。
Vector v1, v2; v1 = Vector_Create(DEFAULT, ...); Vector_InsertAt(v1, ...); ...; ...; Vector_InsertAt(v1, ...); ... ... Vector_Assign(&v2, v1); ...
上面的代码片段将生成以下图片。
void Vector_Assign(Vector* lhs, const Vector rhs{
  Vector_Destroy(lhs);
  *lhs = rhs;
  rhs->ref_count++;
} /* end of void Vector_Assign(Vector*, const Vector) */

Object Vector_InsertAt(const Vector this, Object new_item, unsigned int pos) {
  if (this->cur_size < pos) pos = this->cur_size;
在进行插入之前,我们必须确保结构中有足够的空间。如果没有,我们会根据一些预定义的公式调整容器容量。如果堆内存不足,我们不会对结构进行任何更改,只需从函数中返回 NULL 值。否则,我们会扩展容器所需的内存区域并继续插入:如果新的组件插入到末尾,则将其复制到向量的末尾,由 cur_size 字段指示;如果新的组件插入到末尾以外的位置,则将紧随新项目位置之后的组件向下移动一位,然后进行插入。
  if (this->cap == this->cur_size)
  if (!adjust_capacity(this)) return NULL;
  if (pos != this->cur_size) shift_down(this, pos);
  this->container[pos] = this->copy_component(new_item);
  this->cur_size++;

  return new_item;
} /* end of Object Vector_InsertAt(const Vector, Object, unsigned int) */

Object Vector_RemoveAt(const Vector this, unsigned int pos) {
  Object ret_object;

  if (pos >= this->cur_size) return NULL;
  ret_object = *(this->container + pos);
  if (pos != this->cur_size - 1) shift_up(this, pos);
  this->cur_size--;

  return(ret_object);
} /* end of Object Vector_RemoveAt(const Vector, unsigned int) */

Object Vector_UpdateAt(const Vector this, Object new_item, unsigned int pos) {
  Object old_value;

  if (pos >= this->cur_size) return NULL;

  old_value = *(this->container + pos);
  this->container[pos] = this->copy_component(new_value);

  return old_value;
} /* end of Object Vector_UpdateAt(const Vector, Object, unsigned int)*/

unsigned int Vector_Size(const Vector this) { return(this->cur_size); }
adjust_capacity 函数根据给定的公式扩展 Vector 的容量。在我们的实现中,我们采用大多数 C++ 编译器中使用的公式:如果 Vector 具有非零的容量增量值,则容量将增加此值;如果用户未为此字段提供任何值或其值为零,则新容量将通过将先前容量加倍来计算。(如果当前容量值为零,则新容量将取为 1。)如果无法为 Vector 对象分配足够的存储空间,则将返回 FALSE 值。
static BOOL adjust_capacity(const Vector this) {
  int i;
  const Vector old_this = (Vector)  malloc(sizeof(struct _VECTOR));
  if(!old_this) {
    fprintf(stderr, "Out of memory...\n");
    return FALSE;
  } /* end of if(!old_this) */
  memcpy(old_this, this, sizeof(struct _VECTOR));

  if (this->cap_inc != 0) this->cap += this->cap_inc;
  else if (this->cap == 0) this->cap = 1;
    else this->cap *= 2;
  this->container = calloc(this->cap, sizeof(Object));

  if (!this->container) {
    this->cap = old_this->cap;
    this->container = old_this->container;
    free(old_this);
    fprintf(stderr, "Out of memory...\n");
    return FALSE;
  } /* end of if(!this->container) */

  if (old_this->cap == 0) {
    free(old_this);
    return TRUE;
  } /* end of if(old_this->cap == 0) */
  memcpy(this->container, old_this->container,
  sizeof(Object) * old_this->cur_size);

  free(old_this->container);
  free(old_this);
  return TRUE;
} /* end of BOOL adjust_capacity(const Vector) */
只要在新项目插入到 Vector 末尾以外的任何位置,都需要向下移位。
static void shift_down(const Vector this, unsigned int pos) {
  unsigned int i;
  for(i = this->cur_size; i > pos; i--)
    memcpy(this->container + i, this->container + (i - 1),sizeof(Object));
} /* end of void shift_down(const Vector, unsigned int) */
类似地,只要从 Vector 末尾以外的任何位置删除项目,都需要向上移位。
static void shift_up(const Vector this, unsigned int pos) {
  unsigned int i;
  for(i = pos; i < this->cur_size - 1; i++)
    memcpy(this->container + i, this->container + (i + 1), sizeof(Object));
} /* end of void shift_up(const Vector, unsigned int) */
测试程序
[edit | edit source]#include <stdio.h>
#include "General.h"
#include "Wrappers.h"
#include "utility/Vector.h"
enum {CREATE_COPY = 1, CREATE_DEFAULT, DESTROY, INSERT = 6, PEEK, REMOVE, UPDATE, DISPLAY, EXIT = 0};
Vector v[2];
void display_vec(unsigned int which) {
unsigned int i;
if (!v[which]) {
printf("-----\n");
return;
} /* end of if(!v[which]) */
printf("+++++\n");
printf("Contents of vector #%d\n", which);
for (i = 0; i < Vector_Size(v[which]); i++)
printf("#%d: %d\t", i, Integer_Value(Vector_ElementAt(v[which], i)));
printf("\n");
return;
} /* end of void display_vec(unsigned int) */
int main(void) {
int val;
Integer pval;
unsigned int action, pos, which_vec, from_which_vec;
Vector_Component_Funcs int_funcs = {&Integer_CopyInteger, &Integer_DestroyInteger};
do {
scanf("%d", &action);
switch (action) {
case CREATE_COPY:
scanf("%d %d", &which_vec, &from_which_vec);
printf("Trying to create a copy of vector#%d into vector#%d...", from_which_vec, which_vec);
v[which_vec] = Vector_Create(COPY, v[from_which_vec]);
if (v[which_vec]) printf("+++++\n");
else printf("-----\n");
break;
case CREATE_DEFAULT:
scanf("%d", &which_vec);
printf("Trying to create vector #%d using default constructor...", which_vec);
v[which_vec] = Vector_Create(DEFAULT, int_funcs );
if (v[which_vec]) printf("+++++\n");
else printf("-----\n");
break;
case DESTROY:
scanf("%d", &which_vec);
printf("Trying to destroy vector#%d...", which_vec);
if (!Vector_Destroy(&v[which_vec])) printf("+++++\n");
else printf("-----\n");
break;
case INSERT:
scanf("%d %d %d", &which_vec, &pos, &val);
printf("Trying to insert %d at position %d of vector#%d...", val, pos, which_vec);
请注意,我们插入 Integer 对象(它们基本上是包装在 int 周围的不透明类型对象),而不是 int。这是通过 void* 提供的泛型性的结果,它需要插入指针。
        pval = Integer_Create(val);
        if (Vector_InsertAt(v[which_vec], pval, pos)) printf("+++++\n");
          else printf("-----\n");
        break;

      case REMOVE:
        scanf("%d %d", &which_vec, &pos);
        printf("Trying to remove the item at position %d from vector#%d...", pos, which_vec);
现在,返回的值 (ret_obj) 将被分配给 pval,我们将通过 pval 拥有已删除对象的句柄。
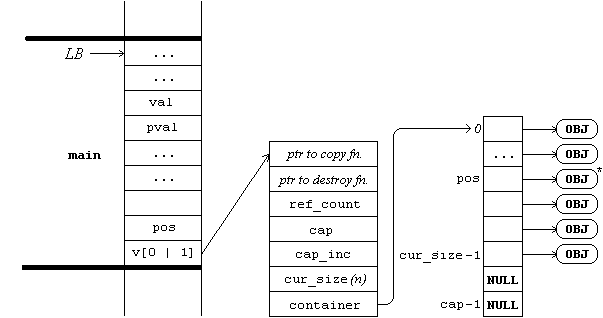
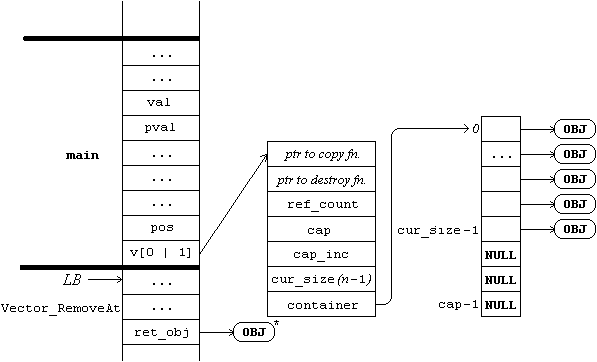
        pval = Vector_RemoveAt(v[which_vec], pos);
        if (pval) printf("+++++%d\n", Integer_Value(pval));
          else printf("-----\n");
        break;
      case PEEK:
        scanf("%d %d", &which_vec, &pos);
        printf("Trying to peek in vector#%d at position %d...", which_vec, pos);
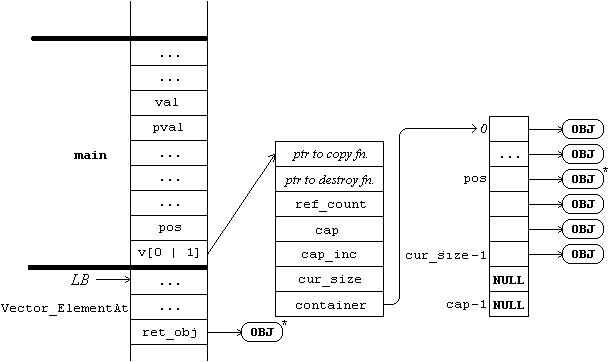
请意识到对象被克隆然后返回。这个新对象在分配给 pval 后,可以独立于原始副本进行操作。
        pval = Vector_ElementAt(v[which_vec], pos);
        if (pval) printf("+++++%d\n", Integer_Value(pval));
          else printf("-----\n");
        break;
      case UPDATE:
	scanf("%d %d %d", &which_vec, &pos, &val);
	printf("Trying to update position %d of vector#%d with %d...", pos, which_vec, val);
	pval = Integer_Create(val);
	if (Vector_UpdateAt(v[which_vec], pval, pos))
          printf("+++++\n");
          else printf("-----\n");
	break;
      case DISPLAY:
        scanf("%d", &which_vec);
        printf("Trying to display vector#%d...", which_vec);
        display_vec(which_vec);
        break;
      case EXIT:
        exit(0);
    } /* end of switch(action) */
  } while (1);
} /* end of int main(void) */
运行测试程序
[edit | edit source](使用 Cygwin)
- gcc –c –ID:/include Vector.c↵
- gcc –o Vector_Test.exe Vector_Test.c Vector.o –lWrappers –ID:/include –LD:/library↵
上面的命令将把在名为 libWrappers.a 的 [静态] 库中找到的必需目标文件带入可执行文件。要使用的库的名称是通过简单地在 –l 开关提供的文件名之前加上 "lib" 并附加 ".a" 来确定的。对该库的搜索将使用 –L 开关传递的目录。
- Vector_Test < Vector_Test.input > Vector_Test.output↵
此命令将把输入和输出重定向到磁盘文件。它仍然会让程序认为它正在从键盘接收输入并将输出发送到屏幕。这可以通过将 stdin 和 stdout 重新映射到不同的物理文件来实现。如果没有重新映射,系统中的所有进程都将具有以下初始文件表
| 物理文件 | 其他字段 | |
|---|---|---|
| 0 | 键盘 | ... |
| 1 | 屏幕 | ... |
| 2 | 屏幕 | ... |
重新映射后,我们有
| 物理文件 | 其他字段 | |
|---|---|---|
| 0 | Vector_Test.input | ... |
| 1 | Vector_Test.output | ... |
| 2 | 屏幕 | ... |
在重新映射之前和之后,我们都有以下宏定义
#define stdin 0 #define stdout 1 #define stderr 2
这一切都是由命令行解释器完成的。用户不需要在源代码中进行任何修改;(他)她仍然可以像在键盘上输入输入并将输出写入屏幕一样进行编程。这是因为我们通过句柄(逻辑文件)读取或写入物理文件。如果我们更改句柄映射到的物理文件,即使我们写入同一个逻辑文件(句柄),最终受到影响的目标也会发生变化。
2 0 6 0 10 5 6 0 10 15 6 0 8 20 6 0 8 25 6 0 2 30 6 0 0 35 10 0 8 0 2 8 0 3 8 0 100 10 0 1 1 0 8 1 1 7 1 0 9 1 2 26 10 1 7 0 2 7 0 5 10 0 3 0 10 0 0
Trying to create vector #0 using default constructor...+++++ Trying to insert 5 at position 10 of vector#0...+++++ Trying to insert 15 at position 10 of vector#0...+++++ Trying to insert 20 at position 8 of vector#0...+++++ Trying to insert 25 at position 8 of vector#0...+++++ Trying to insert 30 at position 2 of vector#0...+++++ Trying to insert 35 at position 0 of vector#0...+++++ Trying to display vector#0...+++++ Contents of vector #0 #0: 35 #1: 5 #2: 15 #3: 30 #4: 20 #5: 25 Trying to remove the item at position 2 from vector#0...+++++15 Trying to remove the item at position 3 from vector#0...+++++20 Trying to remove the item at position 100 from vector#0...----- Trying to display vector#0...+++++ Contents of vector #0 #0: 35 #1: 5 #2: 30 #3: 25 Trying to create a copy of vector#0 into vector#1...+++++ Trying to remove the item at position 1 from vector#1...+++++5 Trying to peek in vector#1 at position 0...+++++35 Trying to update position 2 of vector#1 with 26...+++++ Trying to display vector#1...+++++ Contents of vector #1 #0: 35 #1: 30 #2: 25 Trying to peek in vector#0 at position 2...+++++30 Trying to peek in vector#0 at position 5...----- Trying to display vector#0...+++++ Contents of vector #0 #0: 35 #1: 5 #2: 30 #3: 25 Trying to destroy vector#0...+++++ Trying to display vector#0...-----
无论你是否使用它们,与对象模块静态链接都会引入模块中的所有功能。这意味着你的程序中从未用到的代码也将存在,从而增加可执行文件的大小。可以通过将模块内容拆分成更小的块来避免这种情况。使用这些更小的模块可能会减小可执行文件的大小,但现在你面临另一个问题:必须在命令行上单独写入对象模块的名称。[9]
库提供了两个世界相结合的方案。[10] 与库链接意味着单个模块内的所有外部实体都是可见的。但是,只有使用的模块才会被引入可执行文件。从库中的一个模块切换到另一个模块不会强迫你更改命令行。链接器和库管理器会处理所有细节。
示例:假设 libWrappers.a 包含 Integer.o、Char.o、Short.o 等。在使用过 Integer.o 中的一些功能后,以下命令将导致仅引入 Integer.o。
- gcc –o Vector_Test.exe Vector_Test.c Vector.o –lWrappers –ID:/include –LD:/library↵
如果我们稍后决定使用某个来自 Char.o 的函数,我们不需要在命令行上进行任何修改。链接器-库管理器对将为我们处理细节,并仅引入 Char.o 和 Integer.o。
定义:一个库是对象模块的存档,它除了模块外,通常还包含一些元数据,以便更快地定位各个文件。
Wrappers.h 包含封装基本类型数据和解封装封装数据的所需前向声明和原型。请注意,可以通过将相关信息放在单独的头文件中来完成相同的事情。没有规定说必须为整个库提供单个头文件。事实上,你可以为库中的每个对象模块[甚至每个函数]提供单独的头文件。但是,选择为每个对象模块提供单独的头文件有一个缺点:当你代码中添加一个新的函数调用时,你必须弄清楚它来自哪个头文件,并[可能]添加一个相关的包含指令,这相当于在命令行上编写多个对象文件的问题的翻版。
在某些情况下,在两个极端之间取得平衡可能是一个更好的选择。例如,一个提供数十甚至数百个函数的数学库。在这种情况下,筛选单个头文件无疑是一个费力的过程。为数学库的不同方面提供多个头文件可能是一个好主意。
#ifndef WRAPPERS_H
#define WRAPPERS_H

#include "General.h"
由于我们的泛型向量期望一个不透明指针作为其组件,因此使用它来处理基本数据可能会很痛苦:你必须先封装数据,并在你的交易中使用指向这个封装数据的指针。稍后当你想要将数据打印到某个介质时,你必须进行一些解封装——即检索不透明指针指向的区域的内容——然后打印数据。关于比较、复制和销毁数据,也可以说类似的事情。
这种模式非常常见,因此提供了一个特殊的库(libWrappers.a)来方便用户。如果他可能想要使用 Vector 模块和类似模块来处理基本数据类型,他不必重新发明轮子;他只需使用 libWrappers.a 中找到的函数即可。
整个事情可以比作 Java 中的包装类和 C# 中的自动装箱-拆箱的概念。事实上,这种使用容器的方式如此频繁,以至于 Java 从 1.5 版本开始支持自动装箱-拆箱。
struct _CHAR;
typedef struct _CHAR* Char;
extern Char Char_Create(unsigned char val);
extern void Char_Destroy(Char* this);

extern int Char_CompareChars(Object, Object);
extern Object Char_CopyChar(Object);
extern void Char_DestroyChar(Object);

extern unsigned char Char_Value(Char wrappedChar);

struct _SCHAR;
typedef struct _SCHAR* SChar;
extern SChar SChar_Create(signed char val);
extern void SChar_Destroy(SChar* this);

extern int SChar_CompareSChars(Object, Object);
extern Object SChar_CopySChar(Object);
extern void SChar_DestroySChar(Object);

extern signed char SChar_Value(SChar wrappedSChar);

struct _INTEGER;
typedef struct _INTEGER* Integer;
extern Integer Integer_Create(signed int val);
extern void Integer_Destroy(Integer* this);

extern int Integer_CompareIntegers(Object, Object);
extern Object Integer_CopyInteger(Object);
extern void Integer_DestroyInteger(Object);

extern signed int Integer_Value(Integer wrappedInt);

struct _UINTEGER;
typedef struct _UINTEGER* UInteger;
extern UInteger UInteger_Create(unsigned int val);
extern void UInteger_Destroy(UInteger* this);

extern int UInteger_CompareUIntegers(Object, Object);
extern Object UInteger_CopyUInteger(Object);
extern void UInteger_DestroyUInteger(Object);

extern unsigned int UInteger_Value(UInteger wrappedUInt);

struct _LONG;
typedef struct _LONG* Long;
extern Long Long_Create(signed long val);
extern void Long_Destroy(Long* this);

extern int Long_CompareLongs(Object, Object);
extern Object Long_CopyLong(Object);
extern void Long_DestroyLong(Object);

extern signed long Long_Value(Long wrappedLong);

struct _ULONG;
typedef struct _ULONG* ULong;
extern ULong ULong_Create(unsigned long val);
extern void ULong_Destroy(ULong*);

extern int ULong_CompareULongs(Object, Object);
extern Object ULong_CopyULong(Object);
extern void ULong_DestroyULong(Object);

extern unsigned long ULong_Value(ULong wrappedULong);

struct _SHORT;
typedef struct _SHORT* Short;
extern Short Short_Create(signed short val);
extern void Short_Destroy(Short*);

extern int Short_CompareShorts(Object, Object);
extern Object Short_CopyShort(Object);
extern void Short_DestroyShort(Object);

extern signed short Short_Value(Short wrappedShort);

struct _USHORT;
typedef struct _USHORT* UShort;
extern UShort UShort_Create(unsigned short val);
extern void UShort_Destroy(UShort*);

extern int UShort_CompareUShorts(Object, Object);
extern Object UShort_CopyUShort(Object);
extern void UShort_DestroyUShort(Object);

extern unsigned short UShort_Value(UShort wrappedUShort);

struct _DOUBLE;
typedef struct _DOUBLE* Double;
extern Double Double_Create(double val);
extern void Double_Destroy(Double*);

extern void Double_DestroyDouble(Object);
extern int Double_CompareDoubles(Object, Object);
extern Object Double_CopyDouble(Object);

extern double Double_Value(Double wrappedDouble);

struct _FLOAT;
typedef struct _FLOAT* Float;
extern Float Float_Create(float val);
extern void Float_Destroy(Float*);

extern void Float_DestroyFloat(Object);
extern int Float_CompareFloats(Object, Object);
extern Object Float_CopyFloat(Object);

extern float Float_Value(Float wrappedFloat);

#endif
以下是类型 int 的包装器接口的实现。可以类似地提供其他基本类型的包装器,这些包装器将不包括在本讲义中。
#include <stddef.h>
#include <stdio.h>
#include <stdlib.h>

#include "Wrappers.h"

struct _INTEGER { signed int value; };

Integer Integer_Create(signed int val) {
  Integer this = (Integer) malloc(sizeof(struct _INTEGER));
  if (!this) {
    fprintf(stderr, "Out of memory...\n");
    return NULL;
  } /* end of if(!this) */
  this->value = val;

  return this;
} /* Integer Integer_Create(signed int) */

void Integer_Destroy(Integer* this) {
  Integer this_copy = *this;
  if (this_copy == NULL) return;

  free(this_copy);
  *this = NULL;
} /* end of void Integer_Destroy(Integer*) */

void Integer_DestroyInteger(Object this) {
  Integer_Destroy((Integer*) &this);
} /* void Integer_DestroyInteger(Object) */

int Integer_CompareIntegers(Object this, Object rhs) {
  signed int thisValue = ((Integer) this)->value;
  signed int rhsValue = ((Integer) rhs)->value;

  if (thisValue == rhsValue) return 0;
  else if (thisValue < rhsValue) return -1;
    else return 1;
} /* int Integer_CompareIntegers(Object, Object)*/

Object Integer_CopyInteger(Object this) {
  Integer retVal = Integer_Create(((Integer) this)->value);

  return retVal;
} /* Object Integer_CopyInteger(Object) */

signed int Integer_Value(Integer wrappedInt) {
  return wrappedInt->value;
} /* signed int Integer_Value(Integer) */
使用 Cygwin
在构建库之前,我们需要创建要放入库中的各个对象模块。
gcc –c Char.c –ID:/includegcc –c Integer.c –ID:/include- ...
- ...
如果所有源文件都在同一个目录中,并且该位置不存在其他文件,则可以一步完成。
gcc –c *.c –ID:/include
现在我们可以创建库——或 Unix 中的归档文件——并通过以下命令将对象模块追加到它。这将把所有以 .o 结尾的文件放到 libWrappers.a 中。
ar qc libWrappers.a *.o # 有关 ar 的更多信息,请在命令行中键入“man ar”。
如果你不确定,你可能想列出库的内容。
ar t libWrappers.a- Char.o
- Double.o
- ...
- ...
- UShort.o
现在 libWrappers.a 已经构建完毕,我们可以将其放置在某个固定位置,并像在测试程序中那样使用库中的函数。
使用 Windows
在发出以下命令之前,请确保命令行工具已作为外部命令提供。这可以通过执行[包含在]名为 vcvars32.bat 的批处理文件中找到的命令来轻松完成,该批处理文件位于 Microsoft Visual C/C++ 编译器的 bin 子目录中。
cl /ID:/include /c /TC Char.ccl /ID:/include /c /TC Integer.c- ...
- ...
前面的行创建了构建库所需的 Object 文件。虽然它们相当简短,但它们强调了我们使用的是编译器驱动程序,而不是普通编译器。为了成功引入所需的标题,我们使用 /I 选项将预处理器信息传递给预处理器,告诉它在哪些地方查找标题。由于使用了 /c,我们还告诉编译器驱动程序在链接之前停止。最后,在我们这个示例中并不真正需要,通过使用 /TC,我们告诉适当的编译器将命令行上传递的文件视为 C 源代码。
lib /OUT:Wrappers.lib Char.obj Integer.obj ... # 构建库lib /LIST Wrappers.lib # 列出库内容- Microsoft (R) Library Manager Version 7.10.3077
- Copyright ( C ) Microsoft Corporation. All rights reserved.
- UShort.obj
- ULong.obj
- ...
- ...
- Char.obj
lib 是 Windows 中 ar 的对应物,是库管理器命令。通过传递不同的选项,我们可以让它构建静态库、列出库内容等。
cl /ID:/include /FeVector_Test.exe Vector.obj Wrappers.lib Vector_Test.c # 要获取有关选项的帮助,请将 /? 传递给 cl/D_CRT_SECURE_NO_DEPRECATE /link /NODEFAULTLIB:libc.lib /DEFAULTLIB:libcmt.lib /LIBPATH:D:/library[11]
另一个令人信服的证明,即 cl 实际上是一个编译器驱动程序!为了获得 Vector_Test.exe;预处理和编译 Vector_Test.c 并将生成的 Object 文件与 Vector.obj 和来自 Wrappers.lib 的所需 Object 文件链接,这些文件可以通过使用 /LIBPATH 选项传递给链接器,从给定位置开始搜索找到。
- ↑ 随着继承的引入,同一个容器最终可能包含属于不同但兼容类型项。
- ↑ 但是,这并不意味着我们不能使用其他技术。
- ↑ 传统 C 允许没有命名参数的可变参数函数,而标准 C 至少有一个命名参数。
- ↑ 请注意,existing_vec 是一个局部变量,因此应该出现在图的下部,准确地说是在 ap 下方。标有 existing_vec 的插槽实际上代表对应于第二个参数的未命名形式参数。
- ↑ 这可以作为编译器可能选择不按从左到右的顺序计算实际参数的一个论据。实际上,从右到左的计算似乎是更好的选择。毕竟,最右边的参数是第一个被压入运行时堆栈的。
- ↑ 在浏览 Windows 源代码时,你可能会看到一些函数名前缀有诸如 __cdecl(C 调用约定)、__stdcall(标准调用约定)或 __pascal 之类的指定符。这样的指定符用于说明函数调用中使用的排列类型、命名约定和清理协议。__cdecl 用于可变参数函数,而 __stdcall 用于其他函数。
- ↑ 实际上,删除参数通常只是通过一定数量调整堆栈指针。
- ↑ 还应该添加通过 void* 提供的泛型性。
- ↑ 如果使用可视化工具,则意味着将目标文件添加到项目中。
- ↑ 库可以是静态的或动态的,具体取决于与可执行文件的链接时间。前者在链接时引入目标模块,而后者则推迟到加载或运行时。在本讲义中的演示将仅限于静态库。
- ↑ 2005 年以后的 MS Visual Studio 命令行反映了微软编译器的非标准方面:为了使 C 成为更安全的编程语言,编译器通过警告向程序员建议使用
scanf_s(这是一个微软独有的函数),而不是标准的scanf。我们通过定义_CRT_SECURE_NO_DEPRECATE宏来忽略这一点。从 MS Visual Studio 2005 开始,微软还从其发行版中删除了 libc.lib - 单线程静态 C 运行时。现在与可执行文件链接的默认 C 运行时库是 libcmt.lib,它是 libc.lib 的多线程版本。然而,出于某种原因,链接器可能仍然最终会寻找 libc.lib!为了解决这个明显的缺陷,使用/NODEFAULTLIB选项,我们从要搜索的库列表中删除 libc.lib,并在解决外部引用过程中,使用/DEFAULTLIB选项,在其位置添加 libcmt.lib。因此,在 2005 年以前的 MS Visual Studio 中,此命令行应替换为以下内容。cl /ID:/include /FeVector_Test.exe Vector.obj Wrappers.lib Vector_Test.c /link /LIBPATH:D:/library
