RAC 攻击 - Oracle 集群数据库在家/安装数据库软件
外观
- 以oracle用户身份登录collabn1并打开终端。运行CLUVFY以检查您是否已准备好开始安装数据库。内存、交换空间和 NTP/时间检查可能会失败,但其他所有检查都应该成功。 [oracle@collabn1 ~]$ /mnt/cdrom*/grid/runcluvfy.sh stage -pre dbinst -n collabn1,collabn2 -r 11gR2 正在执行数据库安装前的预检查 检查节点可达性... 节点可达性检查从节点“collabn1”通过 检查用户等效性... 用户等效性检查对于用户“oracle”通过 检查节点连接性... 检查主机配置文件... 主机配置文件验证成功 节点连接性检查对于子网“192.168.78.0”通过,节点为 collabn2、collabn1 TCP 连接性检查对于子网“192.168.78.0”通过 节点连接性检查对于子网“172.16.100.0”通过,节点为 collabn2、collabn1 TCP 连接性检查对于子网“172.16.100.0”通过 在子网“192.168.78.0”上找到的可能作为 VIP 的接口为: collabn2 eth0:192.168.78.52 eth0:192.168.78.250 eth0:192.168.78.62 collabn1 eth0:192.168.78.51 eth0:192.168.78.61 在子网“172.16.100.0”上找到的可能作为私有互连的接口为: collabn2 eth1:172.16.100.52 collabn1 eth1:172.16.100.51 节点连接性检查通过 总内存检查失败 检查在以下节点上失败:collabn2、collabn1 可用内存检查通过 交换空间检查失败 对于“collabn2:/u01/grid/oracle/product/11.2.0/grid_1,collabn2:/tmp”的可用磁盘空间检查通过 对于“collabn1:/u01/grid/oracle/product/11.2.0/grid_1,collabn1:/tmp”的可用磁盘空间检查通过 用户存在性检查对于“oracle”通过 组存在性检查对于“oinstall”通过 组存在性检查对于“dba”通过 用户“oracle”在组“oinstall”中的成员资格检查 [作为主要] 通过 用户“oracle”在组“dba”中的成员资格检查通过 运行级别检查通过 “最大打开文件描述符”的硬限制检查通过 “最大打开文件描述符”的软限制检查通过 “最大用户进程”的硬限制检查通过 “最大用户进程”的软限制检查通过 系统架构检查通过 内核版本检查通过 内核参数检查对于“semmsl”通过 内核参数检查对于“semmns”通过 内核参数检查对于“semopm”通过 内核参数检查对于“semmni”通过 内核参数检查对于“shmmax”通过 内核参数检查对于“shmmni”通过 内核参数检查对于“shmall”通过 内核参数检查对于“file-max”通过 内核参数检查对于“ip_local_port_range”通过 内核参数检查对于“rmem_default”通过 内核参数检查对于“rmem_max”通过 内核参数检查对于“wmem_default”通过 内核参数检查对于“wmem_max”通过 内核参数检查对于“aio-max-nr”通过 包存在性检查对于“make-3.81”通过 包存在性检查对于“binutils-2.17.50.0.6”通过 包存在性检查对于“gcc-4.1.2”通过 包存在性检查对于“libgomp-4.1.2”通过 包存在性检查对于“libaio-0.3.106”通过 包存在性检查对于“glibc-2.5-24”通过 包存在性检查对于“compat-libstdc++-33-3.2.3”通过 包存在性检查对于“elfutils-libelf-0.125”通过 包存在性检查对于“elfutils-libelf-devel-0.125”通过 包存在性检查对于“elfutils-libelf-devel-static-0.125”通过 包存在性检查对于“glibc-common-2.5”通过 包存在性检查对于“glibc-devel-2.5”通过 包存在性检查对于“glibc-headers-2.5”通过 包存在性检查对于“kernel-headers-2.6.18”通过 包存在性检查对于“gcc-c++-4.1.2”通过 包存在性检查对于“libaio-devel-0.3.106”通过 包存在性检查对于“libgcc-4.1.2”通过 包存在性检查对于“libstdc++-4.1.2”通过 包存在性检查对于“libstdc++-devel-4.1.2”通过 包存在性检查对于“sysstat-7.0.2”通过 包存在性检查对于“unixODBC-2.2.11”通过 包存在性检查对于“unixODBC-devel-2.2.11”通过 包存在性检查对于“ksh-20060214”通过 检查具有 UID 值 0 的多个用户检查通过 当前组 ID 检查通过 默认用户文件创建掩码检查通过 检查 CRS 完整性... CRS 完整性检查通过 检查集群管理器完整性... 检查 CSS 守护进程... Oracle 集群同步服务似乎在线。集群管理器完整性检查通过 检查 Clusterware 是否在所有节点上安装... Clusterware 安装检查通过 检查 CTSS 资源是否在所有节点上运行... CTSS 资源检查通过 查询 CTSS 获取所有节点的时间偏移... 查询 CTSS 获取时间偏移通过 检查 CTSS 状态已启动... CTSS 处于观察者状态。切换到使用 NTP 进行时钟同步检查 开始使用网络时间协议 (NTP) 进行时钟同步检查... NTP 配置文件检查已启动... NTP 配置文件检查通过 检查守护进程活动... “ntpd”的活动性检查失败 检查在以下节点上失败:collabn2、collabn1 PRVF-5415 : 检查 NTP 守护进程是否正在运行失败 使用网络时间协议 (NTP) 进行时钟同步检查失败 PRVF-9652 : 集群时间同步服务检查失败 检查时区一致性... 时区一致性检查通过。 数据库安装的预检查在所有节点上失败。
- 使用/mnt/cdrom*/database/runInstaller启动数据库安装程序。

- 在第一个屏幕上,将电子邮件留空并取消选中“安全更新”选项。单击下一步继续。选择是以验证您不想输入电子邮件地址。

- 选择仅安装数据库软件,然后单击下一步。

- 选择真实应用程序集群数据库安装,并选择所有节点。单击下一步继续。

- 选择英语,然后单击下一步。

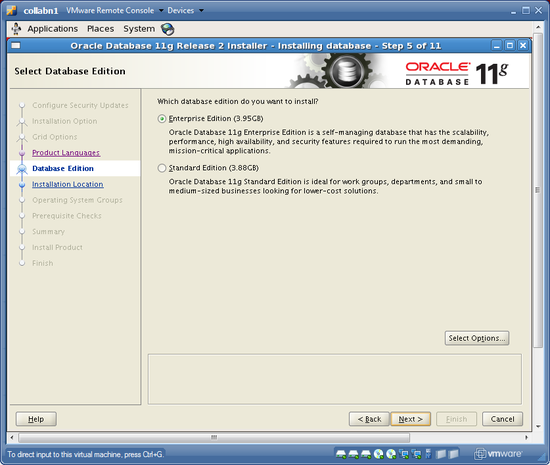
- 选择企业版安装,然后单击下一步。

- 确认 ORACLE_BASE 为 /u01/app/oracle,并将更改ORACLE_HOME 为 /u01/app/oracle/product/11.2.0/db_1。单击下一步继续。

- 验证 OSDBA 组为 dba,而 OSOPER 组为 oper。单击下一步继续。

- 先决条件检查将执行。将显示警告,提示三个检查失败:物理内存、交换空间和网络时间协议。单击复选框以忽略所有,然后单击下一步。

-
在 oracle 用户主目录中保存名为 db.rsp 的响应文件。然后单击完成以安装 oracle 数据库软件。


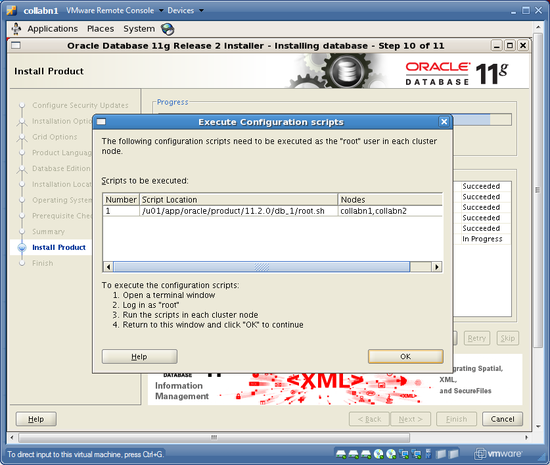
- 出现提示时,以root用户身份打开终端并运行 root.sh 脚本。输入 /usr/bin 作为本地 bin 目录,并覆盖之前由网格基础设施安装的文件。确保在两个节点上运行它!

[oracle@collabn1 ~]$ su -
Password: racattack

[root@collabn1 ~]# /u01/app/oracle/product/11.2.0/db_1/root.sh
Running Oracle 11g root.sh script...

The following environment variables are set as:
    ORACLE_OWNER= oracle
    ORACLE_HOME=  /u01/app/oracle/product/11.2.0/db_1

Enter the full pathname of the local bin directory: [/usr/local/bin]: /usr/bin
The file "dbhome" already exists in /usr/bin.  Overwrite it? (y/n)
[n]: y
   Copying dbhome to /usr/bin ...
The file "oraenv" already exists in /usr/bin.  Overwrite it? (y/n)
[n]: y
   Copying oraenv to /usr/bin ...
The file "coraenv" already exists in /usr/bin.  Overwrite it? (y/n)
[n]: y
   Copying coraenv to /usr/bin ...

Entries will be added to the /etc/oratab file as needed by
Database Configuration Assistant when a database is created
Finished running generic part of root.sh script.
Now product-specific root actions will be performed.
Finished product-specific root actions.
[root@collabn1 ~]# ssh collabn2
root@collabn2's password: racattack
Last login: Tue Apr 15 19:34:33 2008 from 192.168.78.1

[root@collabn2 ~]# /u01/app/oracle/product/11.2.0/db_1/root.sh
Running Oracle 11g root.sh script...

The following environment variables are set as:
    ORACLE_OWNER= oracle
    ORACLE_HOME=  /u01/app/oracle/product/11.2.0/db_1

Enter the full pathname of the local bin directory: [/usr/local/bin]: /usr/bin
The file "dbhome" already exists in /usr/bin.  Overwrite it? (y/n)
[n]: y
   Copying dbhome to /usr/bin ...
The file "oraenv" already exists in /usr/bin.  Overwrite it? (y/n)
[n]: y
   Copying oraenv to /usr/bin ...
The file "coraenv" already exists in /usr/bin.  Overwrite it? (y/n)
[n]: y
   Copying coraenv to /usr/bin ...

Entries will be added to the /etc/oratab file as needed by
Database Configuration Assistant when a database is created
Finished running generic part of root.sh script.
Now product-specific root actions will be performed.
Finished product-specific root actions.
- 运行完两个脚本后,返回安装程序窗口并单击确定以完成安装。您现在应该看到最终屏幕!单击关闭退出安装程序。

ASM 轨道的上一步:设置 ASM
共享文件系统轨道的上一步:增加 CRS 围栏超时 (共享文件系统)


