GLSL 编程/Blender/反射表面
本教程介绍了反射映射(以及用于实现它的立方体贴图)。
这是关于高级纹理映射技术的一系列小型教程中的第二个教程;具体来说,是关于在 Blender 中使用立方体贴图进行环境映射。本教程基于 平滑镜面高光教程 中描述的逐像素光照,以及在 纹理球体教程 中介绍的纹理映射概念。

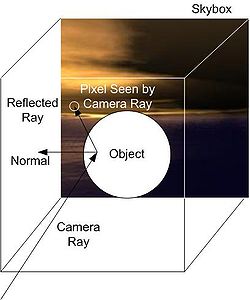
左侧的插图描述了使用静态天空盒进行反射映射的概念:视线在物体表面的一点处被反射,并且反射的光线与天空盒相交以确定相应像素的颜色。天空盒只是一个带有纹理面的大立方体,它围绕着整个场景。需要注意的是,天空盒通常是静态的,不包含场景中的任何动态物体。但是,用于反射映射的“天空盒”通常渲染为从特定视角包含场景。然而,这超出了本教程的范围。此外,本教程只涵盖了反射的计算,不涵盖天空盒的渲染。
为了在物体中反射天空盒,我们必须渲染物体并将来自摄像机的光线反射到表面法向量处的表面点。这种反射的数学原理与光线在表面法向量处的反射相同,我们在 镜面高光教程 中讨论过。
一旦我们获得了反射的光线,就必须计算它与大型天空盒的交点。如果天空盒无限大,这个计算实际上会变得更容易:在这种情况下,表面点的位置完全无关紧要,因为它到坐标系原点的距离与天空盒的大小相比是无限小的;因此,只有反射光线的方向很重要,而不是它的位置。因此,我们实际上也可以考虑从一个小天空盒的中心发出的光线,而不是从无限大天空盒中的某个地方发出的光线。(如果您不熟悉这个想法,您可能需要一些时间来接受它。)根据反射光线的方向,它将与纹理天空盒的六个面之一相交。我们可以计算出哪个面被相交以及面被相交的位置,然后在特定面的纹理图像中进行纹理查找(参见 纹理球体教程)。但是,GLSL 提供了立方体贴图,它使用方向向量来精确地支持在立方体的六个面中进行这种纹理查找。因此,我们所需要做的就是为环境提供一个立方体贴图作为着色器属性,并使用带有反射方向的 textureCube 指令来获取立方体贴图中相应位置的颜色。

左侧的图像显示了 Blender 立方体贴图,它在华夏公益教科书 “Blender 3D 菜鸟到专业” 中有介绍。实际上,它是 Blender 华夏公益教科书中描述的立方体贴图的缩小版本,因为 GLSL 着色器的立方体贴图的面的尺寸必须是 2 的幂,例如 128 × 128。
为了在球体中使用左侧的立方体贴图进行反射,添加一个 UV 球体网格,为它赋予一个材质,并像在 纹理球体教程 中一样创建一个新的纹理。但是,在属性窗口 > 纹理选项卡中选择类型:环境贴图,然后点击环境贴图 > 图像文件。然后下载图像,并在 Blender 中使用环境贴图 > 打开按钮打开它。(如果您选择映射 > 坐标:反射,则预览 > 材质应显示应用的反射贴图。)
顶点着色器必须在世界空间中计算视线方向 viewDirection 和法线方向 normalDirection。我们在 镜面高光教程 中看到了如何在视图空间中计算它们。因此,我们使用这段代码进入世界空间,然后通过使用逆视图矩阵进行变换来返回视图空间,如 视图空间着色教程 中所述。另一个复杂之处在于法向量必须使用转置的逆矩阵进行变换(参见 “应用矩阵变换”)。在这种情况下,逆矩阵是逆视图矩阵的逆,它只是视图矩阵本身。因此,顶点着色器可以是
         uniform mat4 viewMatrix; // world to view transformation
         uniform mat4 viewMatrixInverse;
            // view to world transformation

         varying vec3 viewDirection; // direction in world space
            // in which the viewer is looking
         varying vec3 normalDirection; // normal vector in world space

         void main()
         {
            vec4 positionInViewSpace = gl_ModelViewMatrix * gl_Vertex;
               // transformation of gl_Vertex from object coordinates
               // to view coordinates
            vec4 viewDirectionInViewSpace = positionInViewSpace
               - vec4(0.0, 0.0, 0.0, 1.0);
               // camera is always at (0,0,0,1) in view coordinates;
               // this is the direction in which the viewer is looking
               // (not the direction to the viewer)
            viewDirection =
               vec3(viewMatrixInverse * viewDirectionInViewSpace);
               // transformation from view coordinates to
               // world coordinates
            vec3 normalDirectionInViewSpace =
               gl_NormalMatrix * gl_Normal;
               // transformation of gl_Normal from object coordinates
               // to view coordinates
            normalDirection = normalize(vec3(
               vec4(normalDirectionInViewSpace, 0.0) * viewMatrix));
               // transformation of normal vector from view coordinates
               // to world coordinates with the transposed
               // (multiplication of the vector from the left) of
               // the inverse of viewMatrixInverse, which is viewMatrix
            gl_Position = gl_ModelViewProjectionMatrix * gl_Vertex;
         }
此外,我们必须在 Python 脚本中设置 viewMatrix 和 viewMatrixInverse 的一致性。
      viewMatrix = \
          bge.logic.getCurrentScene().active_camera.world_to_camera
      shader.setUniformMatrix4('viewMatrix', viewMatrix)
      viewMatrixInverse = \
          bge.logic.getCurrentScene().active_camera.camera_to_world
      shader.setUniformMatrix4('viewMatrixInverse', viewMatrixInverse)
现在进入片段着色器。立方体贴图在 GLSL 着色器中与常规的二维纹理类似,但使用 samplerCube 而不是 sampler2D
uniform samplerCube cubeMap;
一致性在 Python 脚本中设置,就像任何其他纹理采样器一样
shader.setSampler('cubeMap', 0)
其中 0 指定纹理列表中的位置。
为了在片段着色器中反射视线方向,我们可以使用 GLSL 函数 reflect,如 镜面高光教程 中所述
            vec3 reflectedDirection =
               reflect(viewDirection, normalize(normalDirection));
为了在立方体贴图中执行纹理查找并将结果颜色存储在片段颜色中,我们通常只需使用
gl_FragColor = textureCube(cubeMap, reflectedDirection);
但是,Blender 似乎重新排列了立方体面;因此,我们必须调整 reflectedDirection 的坐标
            gl_FragColor = textureCube(cubeMap,
               vec3(reflectedDirection.x, -reflectedDirection.z,
               reflectedDirection.y));
这将产生与材质预览一致的反射。
然后着色器代码变为
import bge

cont = bge.logic.getCurrentController()

VertexShader = """
         uniform mat4 viewMatrix; // world to view transformation
         uniform mat4 viewMatrixInverse;
            // view to world transformation

         varying vec3 viewDirection; // direction in world space
            // in which the viewer is looking
         varying vec3 normalDirection; // normal vector in world space

         void main()
         {
            vec4 positionInViewSpace = gl_ModelViewMatrix * gl_Vertex;
               // transformation of gl_Vertex from object coordinates
               // to view coordinates

            vec4 viewDirectionInViewSpace = positionInViewSpace
               - vec4(0.0, 0.0, 0.0, 1.0);
               // camera is always at (0,0,0,1) in view coordinates;
               // this is the direction in which the viewer is looking
               // (not the direction to the viewer)

            viewDirection =
               vec3(viewMatrixInverse * viewDirectionInViewSpace);
               // transformation from view coordinates
               // to world coordinates

            vec3 normalDirectionInViewSpace =
               gl_NormalMatrix * gl_Normal;
               // transformation of gl_Normal from object coordinates
               // to view coordinates

            normalDirection = normalize(vec3(
               vec4(normalDirectionInViewSpace, 0.0) * viewMatrix));
               // transformation of normal vector from view coordinates
               // to world coordinates with the transposed
               // (multiplication of the vector from the left) of
               // the inverse of viewMatrixInverse, which is viewMatrix

            gl_Position = gl_ModelViewProjectionMatrix * gl_Vertex;
         }
"""

FragmentShader = """
         varying vec3 viewDirection;
         varying vec3 normalDirection;
         uniform samplerCube cubeMap;

         void main()
         {
            vec3 reflectedDirection = reflect(viewDirection,
               normalize(normalDirection));

            gl_FragColor = textureCube(cubeMap,
               vec3(reflectedDirection.x, -reflectedDirection.z,
               reflectedDirection.y));
               // usually this would be: gl_FragColor =
               // textureCube(cubeMap, reflectedDirection);
               // however, Blender appears to reshuffle the faces a bit
         }
"""

mesh = cont.owner.meshes[0]
for mat in mesh.materials:
    shader = mat.getShader()
    if shader != None:
        if not shader.isValid():
            shader.setSource(VertexShader, FragmentShader, 1)
            shader.setSampler('cubeMap', 0)
        viewMatrix = \
            bge.logic.getCurrentScene().active_camera.world_to_camera
        shader.setUniformMatrix4('viewMatrix', viewMatrix)
        viewMatrixInverse = \
            bge.logic.getCurrentScene().active_camera.camera_to_world
        shader.setUniformMatrix4('viewMatrixInverse', \
            viewMatrixInverse)
恭喜!您已经完成了第一个关于环境贴图的教程。我们已经看到了
- 如何在物体中计算天空盒的反射。
- 如何在 Blender 中导入合适的立方体贴图以及如何使用它们进行反射映射。
如果您还想了解更多
- 关于向量的反射,您应该阅读 镜面高光教程。
- 关于在 Python 中获取(逆)视图矩阵,您应该阅读 视图空间着色教程。
- 关于变换法向量(使用转置的逆矩阵),您应该阅读 “应用矩阵变换”。
- 关于使用二维纹理图像进行纹理映射,您应该阅读 纹理球体教程。
- 关于 Blender 中的立方体贴图,您可以阅读 “构建天空盒” 部分,该部分在 Blender 3D 华夏公益教科书 中。
