LaTeX/主题
LaTeX 新手经常会因为该系统缺乏视觉自定义功能而感到失望。实际上,这是有意为之:LaTeX 的理念是专注于格式化,而让作者专注于内容。
在本节中,我们将展示通过一些努力可以实现的目标。
简介
[edit | edit source]接下来,我们将编写主题,一个只改变文档外观的包,这样我们的文档就可以使用或不使用主题。
请注意,虽然它可能看起来很美观,但这绝对不是排版的典范。你不应该在严肃的出版物中使用这种主题。这更多的是一个技术示例,展示 LaTeX 的功能。
-
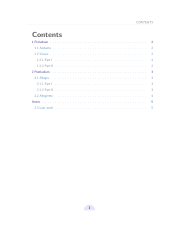
自定义主题(目录)
-
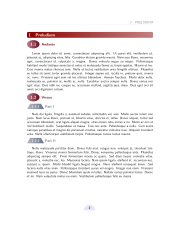
自定义主题
-
自定义主题(红色)
包配置
[edit | edit source]这里没有什么好说的。这直接应用了创建包一章的内容。
我们加载所需的包。
- needspace 用于防止在分节命令后立即出现分页符。
- tikz 用于绘制花哨的素材。
我们定义了一个颜色选项,你可以根据需要使用任意数量的选项。使用特定名称定义颜色使其非常灵活。我们还使用了一个选项来切换花哨的反射效果,这可能有点过分!
\NeedsTeXFormat{LaTeX2e}
\ProvidesPackage{theme-fancy}[2013/01/13 v1.0 fancy theme]

%%%%%%%%%%%%%%%%%%%%%%%%%%%%%%%%%%%%%%%%%%%%%%%%%%%%%%%%%%%%%%%%%%%%%%%%%%%%%%%%
%% Packages

\RequirePackage{geometry}
\RequirePackage{needspace}
\RequirePackage[svgnames]{xcolor}

\RequirePackage{hyperref}
\hypersetup{colorlinks=true}

\RequirePackage{fancyhdr}

\RequirePackage{tikz}
\usetikzlibrary{
  calc,
  decorations.pathmorphing,
  fadings,
  shadows,
  shapes.geometric,
  shapes.misc,
}

%%%%%%%%%%%%%%%%%%%%%%%%%%%%%%%%%%%%%%%%%%%%%%%%%%%%%%%%%%%%%%%%%%%%%%%%%%%%%%%%
%% Options

%% Toggle reflection.
\newif\if@mirrors\@mirrorsfalse
\DeclareOption{mirrors}{
  \@mirrorstrue
}

%% Colors.
\newif\if@red\@redfalse
\DeclareOption{red}{
  \@redtrue
}

\ExecuteOptions{}
\ProcessOptions\relax

%%%%%%%%%%%%%%%%%%%%%%%%%%%%%%%%%%%%%%%%%%%%%%%%%%%%%%%%%%%%%%%%%%%%%%%%%%%%%%%%
%% Configuration

\renewcommand{\familydefault}{\sfdefault}
\setlength{\parskip}{0.5\baselineskip}

%% Colors
\colorlet{toctitle}{DarkGray!50!black}
\colorlet{titlebg}{MidnightBlue}
\colorlet{titlefg}{LightBlue}
\colorlet{titletxt}{MidnightBlue}
\colorlet{sectionfg}{MidnightBlue}
\colorlet{subsectionfg}{SteelBlue}
\colorlet{subsubsectionfg}{LightSteelBlue!60!black}

\if@red
\colorlet{toctitle}{DarkGray!50!black}
\colorlet{titlebg}{DarkRed}
\colorlet{titlefg}{FireBrick!50}
\colorlet{titletxt}{DarkRed}
\colorlet{sectionfg}{DarkRed}
\colorlet{subsectionfg}{Crimson!50!black}
\colorlet{subsubsectionfg}{LightSteelBlue!60!black}
\fi
|
页眉和页脚
[edit | edit source]我们使用 TikZ 绘制一个填充的半圆。
fancyhdr 用于设置页眉和页脚。我们注意使用 fancy 样式,并通过 \fancyhf{} 从头开始擦除之前的页眉和页脚。
%%%%%%%%%%%%%%%%%%%%%%%%%%%%%%%%%%%%%%%%%%%%%%%%%%%%%%%%%%%%%%%%%%%%%%%%%%%%%%%%
%% Header and Footer

\tikzstyle{foliostyle}=[fill=Lavender, text=MidnightBlue, inner sep=5pt, semicircle]

\pagestyle{fancy}
\fancyhf{}
\fancyfoot[C]{
  \vskip 3pt
  \begin{tikzpicture}
    \node[foliostyle]
    {\bfseries\thepage};
  \end{tikzpicture}
}

\renewcommand{\headrulewidth}{0.8pt}
\addtolength{\headheight}{\baselineskip}
\renewcommand{\headrule}{\color{LightGray}\hrule}
\fancyhead[LE]{ \textcolor{gray}{\slshape \rightmark} }
\fancyhead[RO]{ \textcolor{gray}{\slshape \leftmark} }
|
目录
[edit | edit source]我们重新定义了 \tableofcontents 所使用的命令。
%%%%%%%%%%%%%%%%%%%%%%%%%%%%%%%%%%%%%%%%%%%%%%%%%%%%%%%%%%%%%%%%%%%%%%%%%%%%%%%%
%% Table of contents

\newcommand{\sectiontoccolor}{sectionfg}
\newcommand{\subsectiontoccolor}{subsectionfg}
\newcommand{\subsubsectiontoccolor}{subsubsectionfg}

\renewcommand*\l@section{\color{\sectiontoccolor}\def\@linkcolor{\sectiontoccolor}\@dottedtocline{1}{1.5em}{2.3em}}
\renewcommand*\l@subsection{\color{\subsectiontoccolor}\def\@linkcolor{\subsectiontoccolor}\@dottedtocline{1}{2.3em}{3.1em}}
\renewcommand*\l@subsubsection{\color{\subsubsectiontoccolor}\def\@linkcolor{\subsubsectiontoccolor}\@dottedtocline{1}{3.1em}{3.9em}}
\def\contentsline#1#2#3#4{%
  \ifx\\#4\\%
  \csname l@#1\endcsname{#2}{#3}%
  \else
  \csname l@#1\endcsname{\hyper@linkstart{link}{#4}{#2}\hyper@linkend}{%
    \hyper@linkstart{link}{#4}{#3}\hyper@linkend
  }%
  \fi
}

%% New title format -- 'section' is used by default.
\newcommand{\tocformat}[1]{{\Huge\bf#1}}

\renewcommand\tableofcontents{%
  \tocformat{
    \textcolor{toctitle}{\contentsname}
    \@mkboth{\MakeUppercase\contentsname}{\MakeUppercase\contentsname}
  }%
  \@starttoc{toc}%
}
|
分节
[edit | edit source]这绝对是最复杂的部分。它并不难,因为 \section、\subsection 和 \subsubsection 的代码几乎相同。
我们使用 \needspace 来确保在分节命令后不会出现换行符。我们将命令包含在一个组中,在该组中设置字体大小,因为我们需要的是 \baselineskip,它取决于字体大小。
带星号的命令不会设置计数器(LaTeX 的默认行为)。你可以选择通过重置计数器来以不同的方式处理带星号的命令。
我们在打印部分之前使用 \noindent。我们确保使用 \par 命令结束打印部分,以确保后面的文本能够正确打印。
对于 \subsection,我们使用 mirrors 选项来相应地更改外观。
为了正确处理 PDF 书签,我们需要在定义的末尾添加以下几行。
\phantomsection
\addcontentsline{toc}{section}{\thesection~#1}
|
最后,仅对于 \section,我们希望它在页眉中打印,因此我们调用 \sectionmark 命令。在这里,我们改变了带星号命令的行为,使其与原始 LaTeX 版本不同,因为我们定义并使用了 \sectionmarkstar 命令。
%%%%%%%%%%%%%%%%%%%%%%%%%%%%%%%%%%%%%%%%%%%%%%%%%%%%%%%%%%%%%%%%%%%%%%%%%%%%%%%%
%% Section style

\renewcommand\section{
  \@ifstar
  \my@sectionstar
  \my@section
}

%% Note: to justify, text width must be set to \textwidth - 2*(inner sep).
\tikzstyle{sectionstyle}=[
  inner sep=5pt,
  text width=\textwidth-10pt,
  left color=sectionfg!100!white,
  right color=sectionfg!50!white,
  rounded corners,
  text=Ivory,
  rectangle
]

\newcommand\my@section[1]{
  \stepcounter{section}
  {\Large\needspace{\baselineskip}}
  \noindent
  \begin{tikzpicture}
    \node[sectionstyle] {\bfseries\Large\thesection\quad#1};
  \end{tikzpicture}
  \par
  \phantomsection
  \addcontentsline{toc}{section}{\thesection~#1}
  \sectionmark{#1}
}

\newcommand{\sectionmarkstar}[1]{\markboth{\MakeUppercase{#1}}{}}

\newcommand\my@sectionstar[1]{
  {\Large\needspace{\baselineskip}}
  \noindent
  \begin{tikzpicture}
    \node[sectionstyle] {\bfseries\Large#1};
  \end{tikzpicture}
  \par
  \phantomsection
  \addcontentsline{toc}{section}{#1}
  \sectionmarkstar{#1}
}


%%%%%%%%%%%%%%%%%%%%%%%%%%%%%%%%%%%%%%%%%%%%%%%%%%%%%%%%%%%%%%%%%%%%%%%%%%%%%%%%
%% Subsection style

\renewcommand\subsection{
  \@ifstar
  \my@subsectionstar
  \my@subsection
}

\tikzstyle{subsectionstyle}=[
  left color=subsectionfg!50!white,
  right color=subsectionfg!100!white,
  text=Ivory,
  ellipse,
  inner sep=5pt
]

\newcommand\my@subsection[1]{
  \stepcounter{subsection}
  {\Large\needspace{\baselineskip}}
  \noindent
  \begin{tikzpicture}
    \node[subsectionstyle,anchor=west] (number) at (0,0) {\bfseries\Large\thesubsection};
    \if@mirrors
    \node[above right,subsectionfg,anchor=south west] at ($(number.east)+(0.1,-0.1)$) {\large\bfseries#1};
    \node[yscale=-1, scope fading=south, opacity=0.4, above, anchor=south west, subsectionfg] at ($(number.east)+(0.1,0.1)$) {\large\bfseries#1};
    \else
    \node[above right,subsectionfg,anchor=west] at ($(number.east)+(0.1,0)$) {\large\bfseries#1};
    \fi
  \end{tikzpicture}
  \par
  \phantomsection
  \addcontentsline{toc}{subsection}{\thesubsection~#1}
}

\newcommand\my@subsectionstar[1]{
  {\Large\needspace{\baselineskip}}
  \noindent
  \begin{tikzpicture}
    \node[subsectionstyle,anchor=west] (number) at (0,0) {\bfseries\Large\phantom{1}};
    %
    \if@mirrors
    \node[above right,subsectionfg,anchor=south west] at ($(number.east)+(0.1,-0.1)$) {\large\bfseries#1};
    \node[yscale=-1, scope fading=south, opacity=0.4, above, anchor=south west, subsectionfg] at ($(number.east)+(0.1,0.1)$) {\large\bfseries#1};
    \else
    \node[above right,subsectionfg,anchor=west] at ($(number.east)+(0.1,0)$) {\large\bfseries#1};
    \fi
  \end{tikzpicture}
  \par
  \phantomsection
  \addcontentsline{toc}{subsection}{#1}
}

%%%%%%%%%%%%%%%%%%%%%%%%%%%%%%%%%%%%%%%%%%%%%%%%%%%%%%%%%%%%%%%%%%%%%%%%%%%%%%%%
%% Subsubsection style

\renewcommand\subsubsection{
  \@ifstar
  \my@subsubsectionstar
  \my@subsubsection
}

\tikzstyle{subsubsectionstyle}=[
  left color=subsubsectionfg!50!white,
  right color=subsubsectionfg!100!white,
  text=Ivory,
  shape=trapezium,
  inner sep=5pt
]

\newcommand\my@subsubsection[1]{
  \stepcounter{subsubsection}
  \noindent
  \begin{tikzpicture}
	\node[subsubsectionstyle] (number) {\bfseries\large\thesubsubsection};
	\node[subsubsectionfg, right of=number, anchor=west] {\large\bfseries#1};
  \end{tikzpicture}
  \par
  \phantomsection
  \addcontentsline{toc}{subsubsection}{\thesubsubsection~#1}
}

\newcommand\my@subsubsectionstar[1]{
  \noindent
  \begin{tikzpicture}
	\node[subsubsectionstyle] (number) {\bfseries\large\vphantom{1}};
	\node[subsubsectionfg, right of=number, anchor=west] {\large\bfseries#1};
  \end{tikzpicture}
  \par
  \phantomsection
  \addcontentsline{toc}{subsubsection}{#1}
}

\endinput
|
注释和参考文献
[edit | edit source]


